Manage and visualize your GCP Compute Engine instances
This guide demonstrates how to bring your GCP Compute Engine management experience into Port. You will learn how to:
- Ingest Compute Engine data into Port's software catalog using Port's GCP integration.
- Set up self-service actions to manage Compute Engine instances (start and stop).
- Build dashboards in Port to monitor and take action on your Compute Engine resources.
Common use cases
- Monitor the status and health of all Compute Engine instances across projects from a single dashboard.
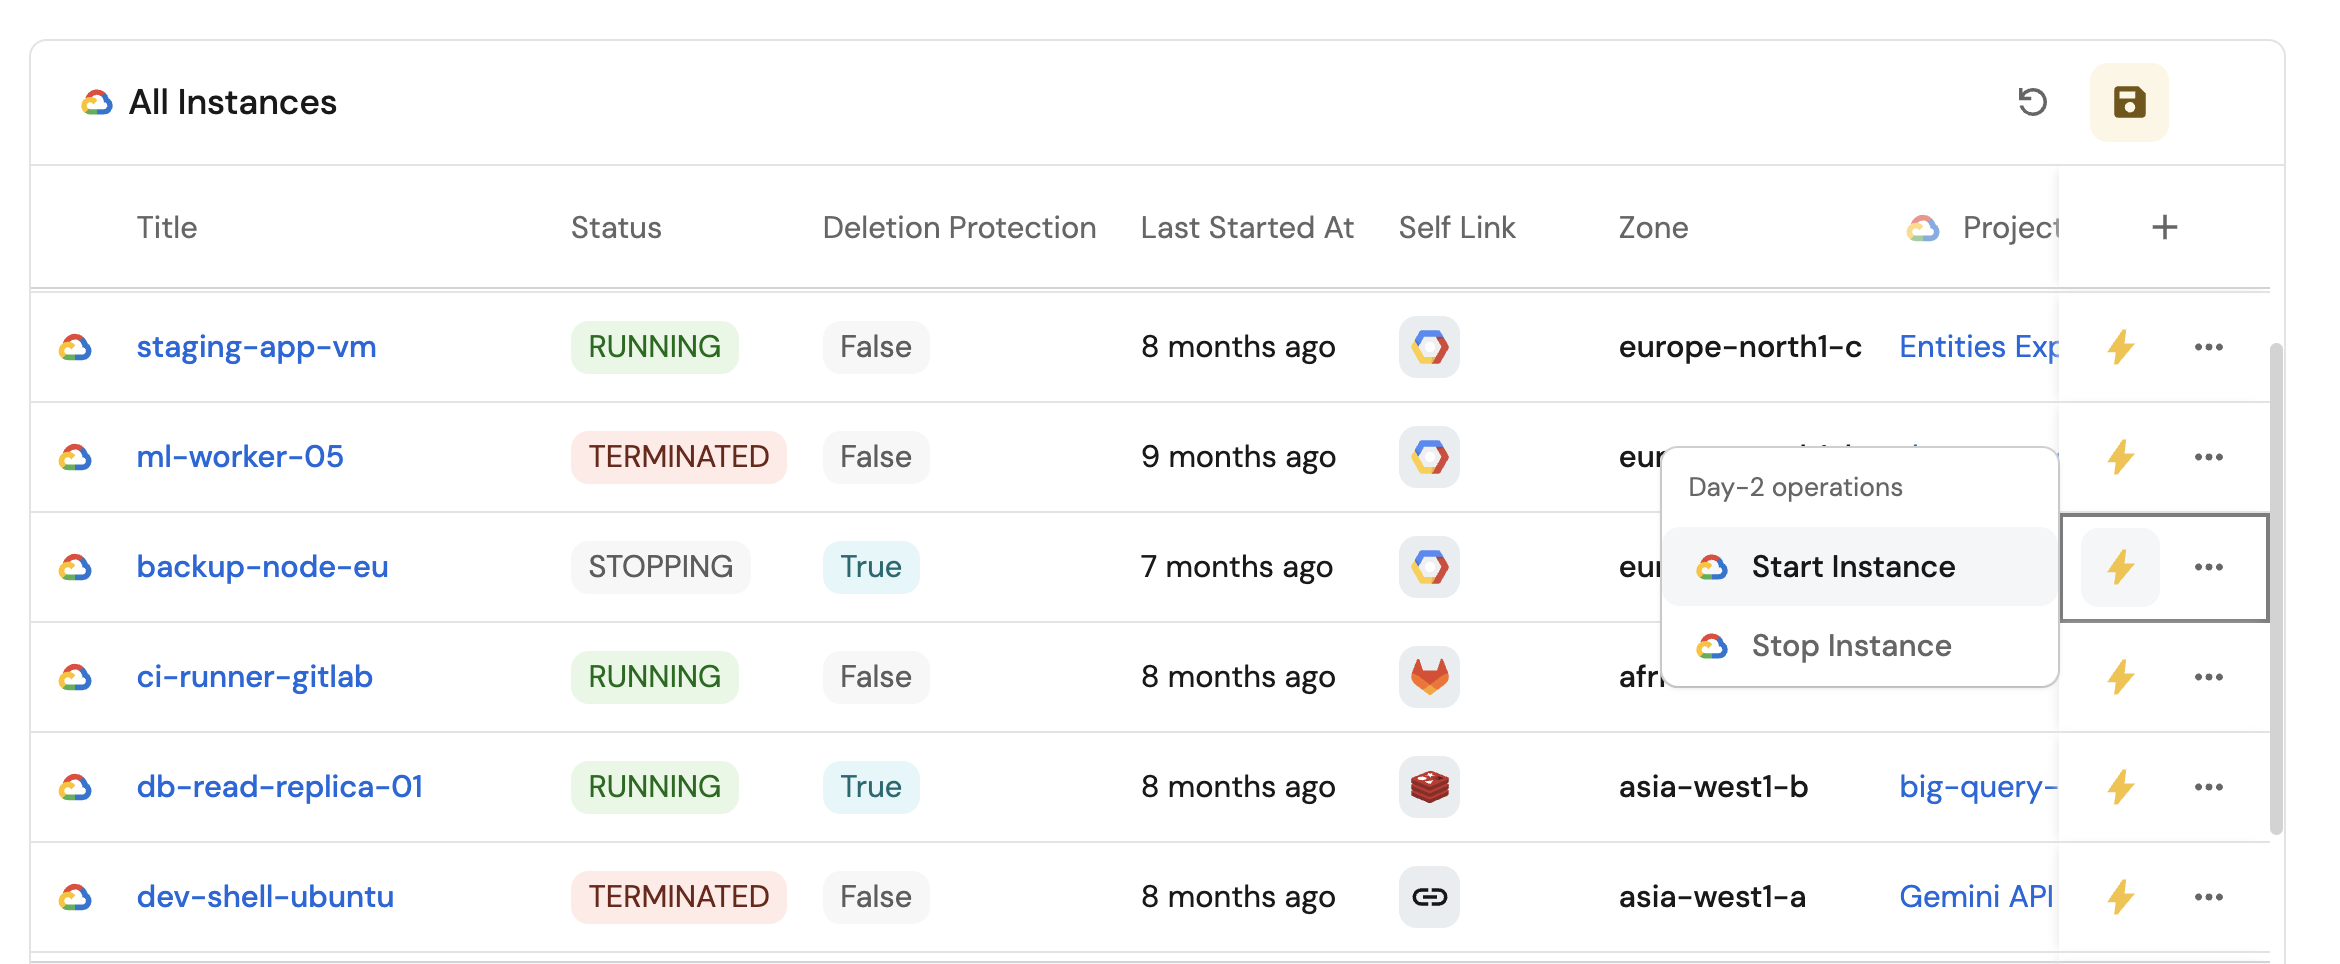
- Empower platform teams to automate day-2 operations via GitHub workflows.
- Track instances without deletion protection for security compliance.
Prerequisites
This guide assumes the following:
- You have a Port account and have completed the onboarding process.
- Port's GCP integration is installed in your account.
We recommend creating a dedicated repository for the workflows that are used by Port actions.
Set up data model
When installing the GCP integration in Port, the GCP Project blueprint is created by default.
However, the Compute Instance blueprint is not created automatically so we will need to create it manually.
Create the Compute Instance blueprint
-
Go to the Builder page of your portal.
-
Click on
+ Blueprint. -
Click on the
{...}button in the top right corner, and chooseEdit JSON. -
Add this JSON schema:
GCP Compute Instance blueprint (Click to expand)
{
  "identifier": "gcpComputeInstance",
  "description": "This blueprint represents a GCP Compute Instance in our software catalog",
  "title": "Compute Instance",
  "icon": "GoogleCloud",
  "schema": {
    "properties": {
      "subnetworks": {
        "title": "Subnetwork",
        "type": "array"
      },
      "cpuPlatform": {
        "title": "CPU Platform",
        "type": "string"
      },
      "status": {
        "type": "string",
        "title": "Status",
        "enum": [
          "RUNNING",
          "STOPPING",
          "TERMINATED"
        ],
        "enumColors": {
          "RUNNING": "green",
          "STOPPING": "lightGray",
          "TERMINATED": "red"
        }
      },
      "createdAt": {
        "type": "string",
        "title": "Created At",
        "format": "date-time"
      },
      "tags": {
        "type": "object",
        "title": "Tags"
      },
      "deletionProtection": {
        "type": "boolean",
        "title": "Deletion Protection"
      },
      "lastStartedAt": {
        "type": "string",
        "title": "Last Started At",
        "format": "date-time"
      },
      "selfLink": {
        "type": "string",
        "title": "Self Link",
        "format": "url"
      },
      "zone": {
        "type": "string",
        "title": "Zone"
      }
    },
    "required": []
  },
  "mirrorProperties": {},
  "calculationProperties": {},
  "aggregationProperties": {},
  "relations": {
    "project": {
      "title": "Project",
      "target": "gcpProject",
      "required": false,
      "many": false
    }
  }
} -
Click
Saveto create the blueprint.
Update the integration mapping
-
Go to the Data Sources page of your portal.
-
Select the GCP integration.
-
Add the following YAML block into the editor to ingest compute instances from your GCP projects:
GCP integration configuration (Click to expand)
deleteDependentEntities: true
createMissingRelatedEntities: true
enableMergeEntity: true
resources:
  - kind: cloudresourcemanager.googleapis.com/Project
    selector:
      query: 'true'
    port:
      entity:
        mappings:
          identifier: .name
          title: .display_name
          blueprint: '"gcpProject"'
          properties:
            labels: .labels
  - kind: compute.googleapis.com/Instance
    selector:
      query: 'true'
    port:
      entity:
        mappings:
          identifier: .id
          title: .name
          blueprint: '"gcpComputeInstance"'
          properties:
            machineType: .machineType
            createdAt: .creationTimestamp
            status: .status
            subnetworks: .networkInterfaces[].subnetwork
            cpuPlatform: .cpuPlatform
            selfLink: .selfLink
            tags: .tags
            deletionProtection: .deletionProtection
            lastStartedAt: .lastStartTimestamp
            zone: .zone | split("/")[-1]
          relations:
project: .__project.name -
Click
Save & Resyncto apply the mapping.
Set up self-service actions
Now let us create self-service actions to manage your Compute Engine instances directly from Port using GitHub Actions. You will implement workflows to:
- Start a Compute Engine instance.
- Stop a Compute Engine instance.
To implement these use-cases, follow the steps below:
Add GitHub secrets
In your GitHub repository, go to Settings > Secrets and add the following secrets:
PORT_CLIENT_ID- Port Client ID learn more.PORT_CLIENT_SECRET- Port Client Secret learn more.GCP_SERVICE_ACCOUNT_KEY- Your GCP service account key JSON (minified to a single line).
To avoid aggressive log sanitization, minify your service account JSON into a single line before storing it as a GitHub secret. You can use an online tool or the following command to minify the json:
jq -c '.' your-service-account-key.json | pbcopy
The GCP service account must have the following permissions:
compute.instances.start- to start Compute Engine instancescompute.instances.stop- to stop Compute Engine instancescompute.instances.get- to read instance details (used to extract zone information)compute.zones.get- to list zones (for zone validation)
Alternatively, you can assign the roles/compute.instanceAdmin.v1 role which includes these permissions.
Start a Compute Engine instance
Add GitHub workflow
Create the file .github/workflows/start-gcp-instance.yaml in the .github/workflows folder of your repository.
Start Compute Engine GitHub workflow (Click to expand)
name: Start GCP Compute Engine Instance

on:
  workflow_dispatch:
    inputs:
      port_context:
        required: true
        description: 'Action and general context (blueprint, entity, run id, etc...)'
        type: string

jobs:
  start-instance:
    runs-on: ubuntu-latest
    # Add "id-token" with the intended permissions.
    permissions:
      contents: 'read'
      id-token: 'write'
    steps:
      - uses: 'actions/checkout@v4'

      - name: Inform Port of workflow start
        uses: port-labs/port-github-action@v1
        with:
          clientId: ${{ secrets.PORT_CLIENT_ID }}
          clientSecret: ${{ secrets.PORT_CLIENT_SECRET }}
          baseUrl: https://api.getport.io
          operation: PATCH_RUN
          runId: ${{fromJson(inputs.port_context).runId}}
          logMessage: Configuring GCP credentials to start Compute Engine instance with name ${{ fromJson(inputs.port_context).entity.title }}

      - id: 'auth'
        uses: 'google-github-actions/auth@v2'
        with:
          credentials_json: '${{ secrets.GCP_SERVICE_ACCOUNT_KEY }}'

      - name: Set up Cloud SDK
        uses: google-github-actions/setup-gcloud@v2

      - name: Start Compute Engine instance
        run: |
          gcloud compute instances start ${{ fromJson(inputs.port_context).entity.title }} --zone=${{ fromJson(inputs.port_context).entity.properties.zone }}

      - name: Inform Port about Compute Engine start success
        if: success()
        uses: port-labs/port-github-action@v1
        with:
          clientId: ${{ secrets.PORT_CLIENT_ID }}
          clientSecret: ${{ secrets.PORT_CLIENT_SECRET }}
          baseUrl: https://api.getport.io
          operation: PATCH_RUN
          runId: ${{ fromJson(inputs.port_context).runId }}
          status: 'SUCCESS'
          logMessage: ✅ Compute Engine instance with name ${{ fromJson(inputs.port_context).entity.title }} started successfully
          summary: Compute Engine instance start completed successfully

      - name: Inform Port about Compute Engine start failure
        if: failure()
        uses: port-labs/port-github-action@v1
        with:
          clientId: ${{ secrets.PORT_CLIENT_ID }}
          clientSecret: ${{ secrets.PORT_CLIENT_SECRET }}
          baseUrl: https://api.getport.io
          operation: PATCH_RUN
          runId: ${{ fromJson(inputs.port_context).runId }}
          status: 'FAILURE'
          logMessage: ❌ Failed to start Compute Engine instance with name ${{ fromJson(inputs.port_context).entity.title }}
          summary: Compute Engine instance start failed
Create Port action
-
Go to the Self-service page of your portal.
-
Click on the
+ New Actionbutton. -
Click on the
{...} Edit JSONbutton. -
Copy and paste the following JSON configuration into the editor.
Start Compute Engine instance action (Click to expand)
Modification RequiredMake sure to replace
<GITHUB_ORG>and<GITHUB_REPO>with your GitHub organization and repository names respectively.{
"identifier": "start_gcp_compute_instance",
"title": "Start Compute Engine Instance",
"icon": "GoogleCloud",
"description": "Start a GCP Compute Engine Instance",
"trigger": {
"type": "self-service",
"operation": "DAY-2",
"userInputs": {
"properties": {},
"required": []
},
"blueprintIdentifier": "gcpComputeInstance"
},
"invocationMethod": {
"type": "GITHUB",
"org": "<GITHUB-ORG>",
"repo": "<GITHUB-REPO>",
"workflow": "start-gcp-instance.yaml",
"workflowInputs": {
"port_context": {
"entity": "{{ .entity }}",
"runId": "{{ .run.id }}"
}
},
"reportWorkflowStatus": true
},
"requiredApproval": false
} -
Click
Save.
Now you should see the Start Compute Engine Instance action in the self-service page. 🎉
Stop a Compute Engine instance
Add GitHub workflow
Create the file .github/workflows/stop-gcp-instance.yaml in the .github/workflows folder of your repository.
Stop Compute Engine GitHub workflow (Click to expand)
name: Stop GCP Compute Engine Instance

on:
  workflow_dispatch:
    inputs:
      port_context:
        required: true
        description: 'Action and general context (blueprint, entity, run id, etc...)'
        type: string

jobs:
  stop-instance:
    runs-on: ubuntu-latest
    # Add "id-token" with the intended permissions.
    permissions:
      contents: 'read'
      id-token: 'write'
    steps:
      - uses: 'actions/checkout@v4'

      - name: Inform Port of workflow stop
        uses: port-labs/port-github-action@v1
        with:
          clientId: ${{ secrets.PORT_CLIENT_ID }}
          clientSecret: ${{ secrets.PORT_CLIENT_SECRET }}
          baseUrl: https://api.getport.io
          operation: PATCH_RUN
          runId: ${{fromJson(inputs.port_context).runId}}
          logMessage: Configuring GCP credentials to stop Compute Engine instance with name ${{ fromJson(inputs.port_context).entity.title }}

      - id: 'auth'
        uses: 'google-github-actions/auth@v2'
        with:
          credentials_json: '${{ secrets.GCP_SERVICE_ACCOUNT_KEY }}'

      - name: Set up Cloud SDK
        uses: google-github-actions/setup-gcloud@v2

      - name: Stop Compute Engine instance
        run: |
          gcloud compute instances stop ${{ fromJson(inputs.port_context).entity.title }} --zone=${{ fromJson(inputs.port_context).entity.properties.zone }}

      - name: Inform Port about Compute Engine stop success
        if: success()
        uses: port-labs/port-github-action@v1
        with:
          clientId: ${{ secrets.PORT_CLIENT_ID }}
          clientSecret: ${{ secrets.PORT_CLIENT_SECRET }}
          baseUrl: https://api.getport.io
          operation: PATCH_RUN
          runId: ${{ fromJson(inputs.port_context).runId }}
          status: 'SUCCESS'
          logMessage: ✅ Compute Engine instance with name ${{ fromJson(inputs.port_context).entity.title }} stopped successfully
          summary: Compute Engine instance stop completed successfully

      - name: Inform Port about Compute Engine stop failure
        if: failure()
        uses: port-labs/port-github-action@v1
        with:
          clientId: ${{ secrets.PORT_CLIENT_ID }}
          clientSecret: ${{ secrets.PORT_CLIENT_SECRET }}
          baseUrl: https://api.getport.io
          operation: PATCH_RUN
          runId: ${{ fromJson(inputs.port_context).runId }}
          status: 'FAILURE'
          logMessage: ❌ Failed to stop Compute Engine instance with name ${{ fromJson(inputs.port_context).entity.title }}
          summary: Compute Engine instance stop failed
Create Port action
-
Go to the Self-service page of your portal.
-
Click on the
+ New Actionbutton. -
Click on the
{...} Edit JSONbutton. -
Copy and paste the following JSON configuration into the editor.
Stop Compute Engine instance action (Click to expand)
Modification RequiredMake sure to replace
<GITHUB_ORG>and<GITHUB_REPO>with your GitHub organization and repository names respectively.{
"identifier": "stop_gcp_compute_instance",
"title": "Stop Compute Engine Instance",
"icon": "GoogleCloud",
"description": "Stop a GCP Compute Engine Instance",
"trigger": {
"type": "self-service",
"operation": "DAY-2",
"userInputs": {
"properties": {},
"required": []
},
"blueprintIdentifier": "gcpComputeInstance"
},
"invocationMethod": {
"type": "GITHUB",
"org": "<GITHUB-ORG>",
"repo": "<GITHUB-REPO>",
"workflow": "stop-gcp-instance.yaml",
"workflowInputs": {
"port_context": {
"entity": "{{ .entity }}",
"blueprint": "{{ .action.blueprint }}",
"runId": "{{ .run.id }}"
}
},
"reportWorkflowStatus": true
},
"requiredApproval": false
} -
Click
Save.
Now you should see the Stop Compute Engine Instance action in the self-service page. 🎉
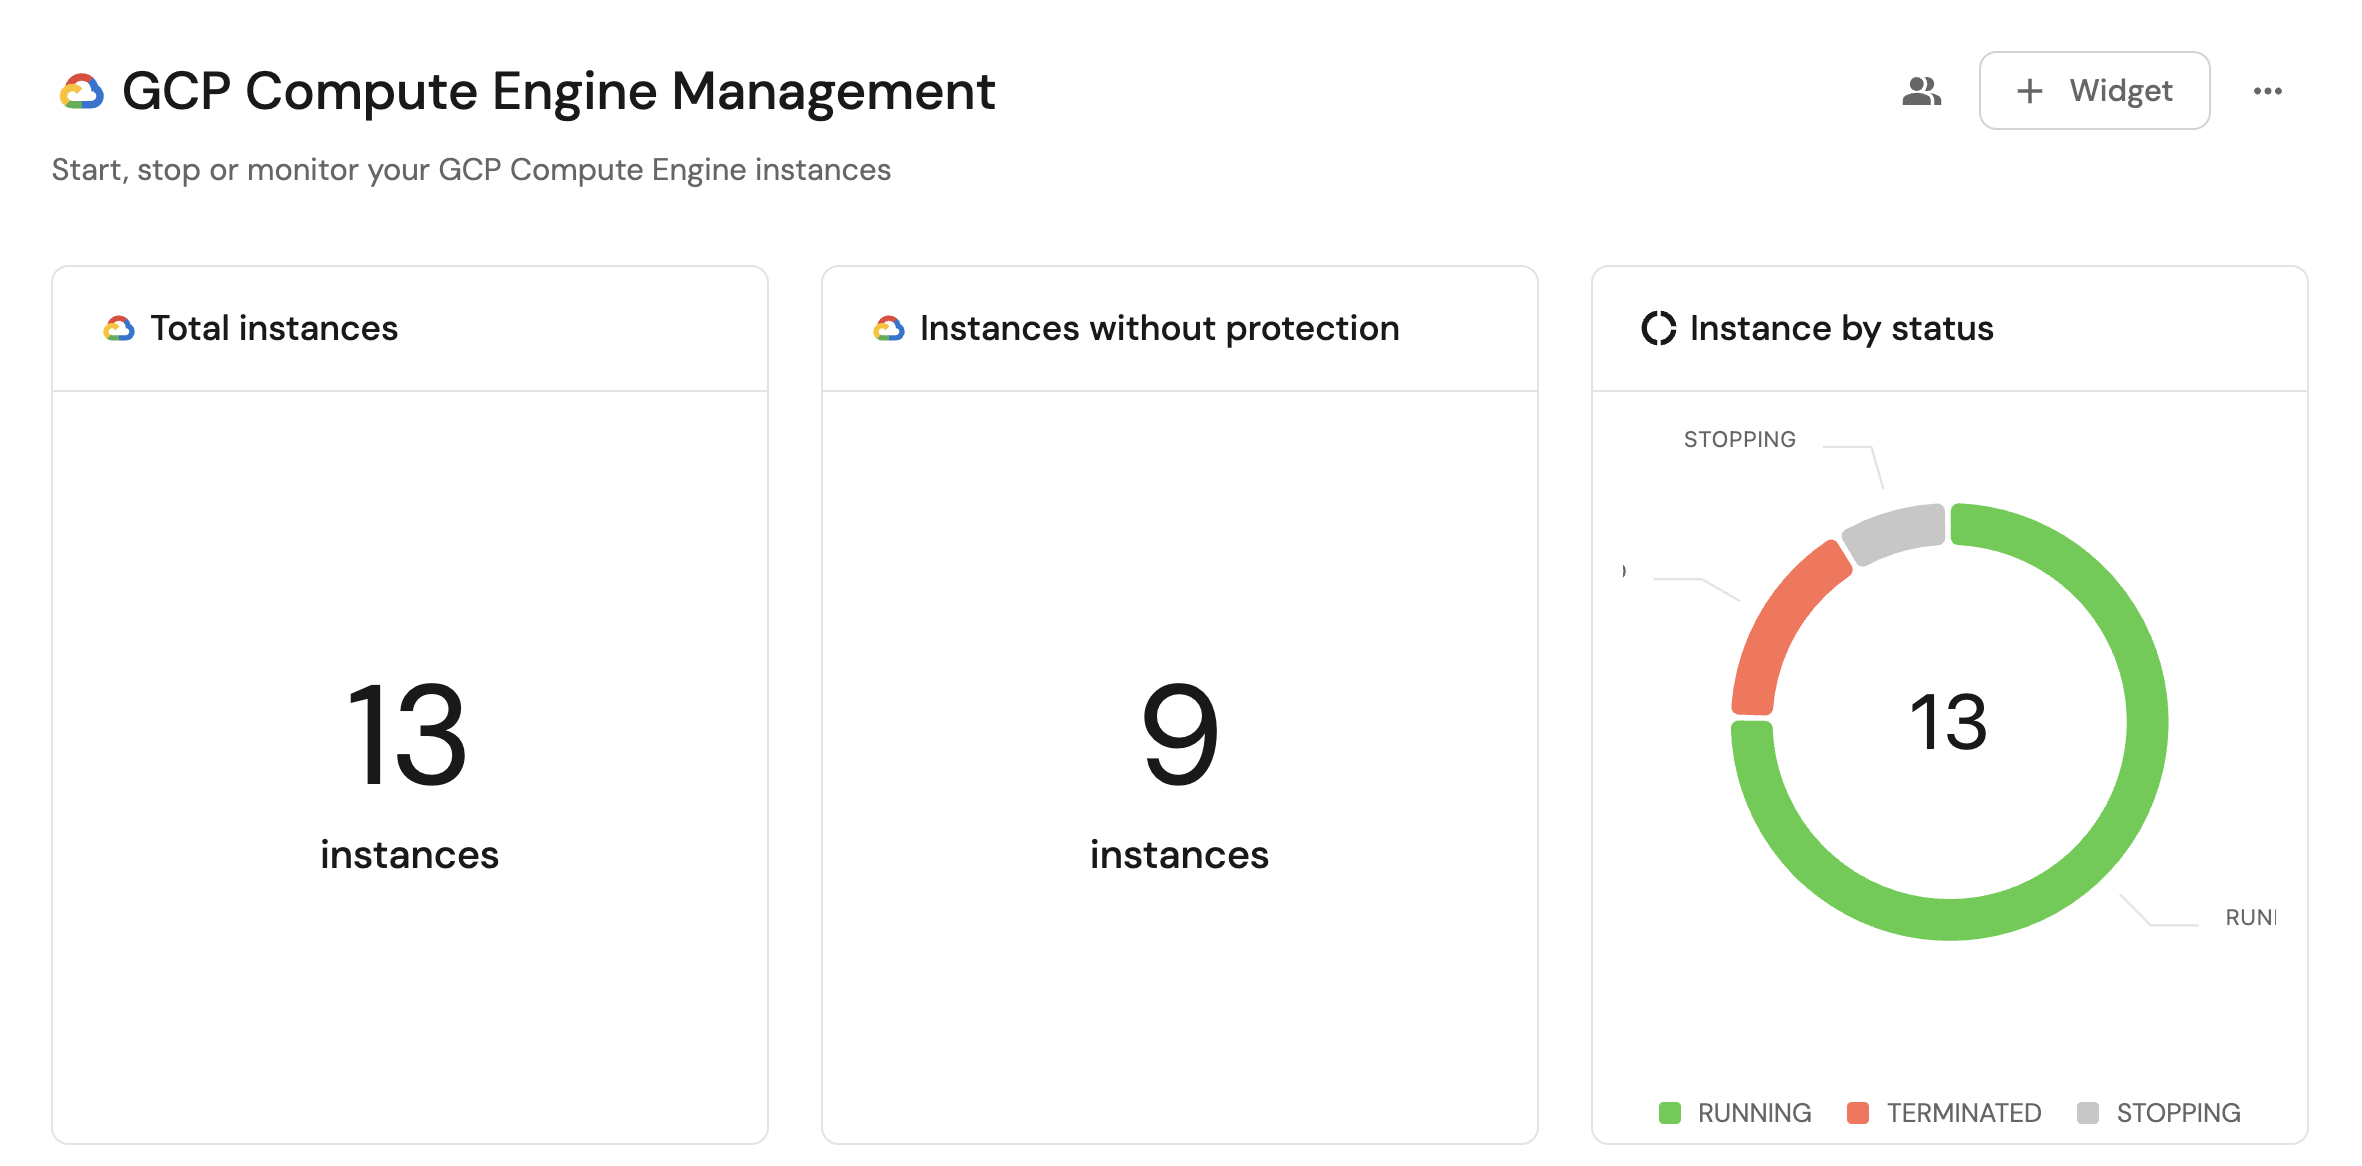
Visualize metrics
With your data and actions in place, we can create a dedicated dashboard in Port to visualize all Compute Engine instances by status, track deletion protection, and take action directly from the dashboard.
Create a dashboard
- Navigate to the Catalog page of your portal.
- Click on the
+ Newbutton in the left sidebar. - Select New dashboard.
- Name the dashboard GCP Compute Engine Management.
- Input
Start, stop or monitor your GCP Compute Engine instancesunder Description. - Select the
GoogleCloudicon. - Click
Create.
We now have a blank dashboard where we can start adding widgets to visualize insights from our GCP Compute Engine instances.
Add widgets
In the new dashboard, create the following widgets:
Total instances (click to expand)
- Click
+ Widgetand select Number Chart. - Title:
Total instances(add theGoogleCloudicon). - Select
Count entitiesChart type and choose Compute Instance as the Blueprint. - Select
countfor the Function. - Select
customas the Unit and inputinstancesas the Custom unit - Click
Save.
Instances without deletion protection (click to expand)
- Click
+ Widgetand select Number Chart. - Title:
Instances without deletion protection(add theGoogleCloudicon). - Select
Count entitiesChart type and choose Compute Instance as the Blueprint. - Add a filter:
deletionProtectionequalsfalse. - Select
countfor the Function. - Select
customas the Unit and inputinstancesas the Custom unit - Click
Save.
Instance by status (click to expand)
- Click
+ Widgetand select Pie chart. - Title:
Instance by status(add theGoogleCloudicon). - Choose the Compute Instance blueprint.
- Under
Breakdown by property, select the Status property - Click Save.
Compute instances view (click to expand)
- Click
+ Widgetand select Table. - Title the widget All Instances.
- Choose the Compute Instance blueprint
- Click Save to add the widget to the dashboard.
- Click on the
...button in the top right corner of the table and select Customize table. - In the top right corner of the table, click on
Manage Propertiesand add the following properties:- Status: The current status of the instance.
- Created At: When the instance was created.
- Deletion Protection: Whether deletion protection is enabled.
- Project: The name of each related GCP project.
- Zone: The zone where the instance is located.
- Click on the save icon in the top right corner of the widget to save the customized table.